

Microsoft SQL Server is one of the most widely adopted relational database management systems (RDBMS) in enterprise environments. While its advanced features power mission-critical applications across industries, the first step toward leveraging its capabilities is installation and configuration. For beginners, this process can feel intimidating. However, with the right approach and structured setup, SQL Server can be deployed efficiently, securely, and with scalability in mind.
This article provides a detailed, step-by-step guide for setting up Microsoft SQL Server on Windows, introducing the essential concepts that form the foundation of effective database administration.
Understanding SQL Server Editions
Before installation, it is important to select the correct edition of SQL Server:
- Express Edition – Free and lightweight, suitable for small applications, learning, and limited workloads.
- Standard Edition – Offers advanced functionality for mid-sized businesses, supporting higher scalability and business continuity features.
- Enterprise Edition – Designed for large-scale deployments, featuring high availability, advanced analytics, and extensive performance tuning.
- Developer Edition – Free edition with full enterprise functionality, intended strictly for development and testing.
Choosing the right edition ensures your environment aligns with both technical and business requirements.
Prerequisites for Installation
To ensure a successful setup, validate the following prerequisites:
- Operating System – A supported version of Windows (Server or Desktop).
- Hardware Requirements – Minimum CPU cores, memory, and disk capacity as outlined by Microsoft’s guidelines.
- Administrative Access – Installation requires administrator privileges.
- .NET Framework – Verify installation of the required .NET version (usually installed by default on modern systems).
- Network Configuration – Determine if SQL Server will run locally or be exposed for remote connections.
Failing to prepare these prerequisites often leads to configuration errors later in the process.
Step 1: Downloading SQL Server
Visit Microsoft’s official website to download the SQL Server installer. For beginners, the Express or Developer edition is recommended. The download typically includes SQL Server Management Studio (SSMS), though SSMS may need to be installed separately depending on the package.
Step 2: Running the Installer
Launch the installer and choose New SQL Server Stand-Alone Installation. Key setup stages include:
- License Agreement – Accept the terms.
- Feature Selection – Select the Database Engine Services as a minimum. Beginners can also install SQL Server Replication, Full-Text Search, and Reporting Services for experimentation.
- Instance Configuration – You can select the default instance (
MSSQLSERVER) or create a named instance. Beginners typically use the default instance. - Server Configuration – Choose service accounts. For beginners, the default virtual account is sufficient.
Step 3: Authentication Mode
SQL Server supports two authentication modes:
- Windows Authentication – Relies on Windows credentials and integrates with Active Directory.
- Mixed Mode Authentication – Supports both Windows and SQL Server logins. This mode provides flexibility but requires setting a strong
sa(system administrator) password.
For beginners, Mixed Mode is recommended since it enables practice with both methods.
Step 4: Configuring the Database Engine
During setup, you must add database administrators. Ensure at least one Windows account (usually your own) is configured with sysadmin privileges. You can also configure data directories at this stage if you want to separate system databases from user databases.
Step 5: Completing Installation
Once the installation completes, validate the setup by launching SQL Server Management Studio (SSMS) and connecting to the server using your authentication mode. From here, you can begin creating your first databases, tables, and SQL queries.
Post-Installation Best Practices
- Update SQL Server
Install the latest cumulative updates (CUs) and service packs. Staying current ensures stability and security. - Configure Firewall Rules
If the server needs remote access, allow SQL Server’s default port (TCP 1433) in the Windows firewall. - Enable TCP/IP Protocols
Use SQL Server Configuration Manager to enable network protocols such as TCP/IP and Named Pipes. - Set Up Backups
Implement a backup strategy immediately. Use SSMS or SQL Server Agent to schedule automated backups of system and user databases. - Security Hardening
Disable thesaaccount if not required. Assign least privilege roles to accounts. Encrypt connections using SSL/TLS certificates if available.
Common Mistakes to Avoid
- Skipping Authentication Choices – Beginners often overlook the significance of authentication modes. Choosing the wrong mode can lock you out of your own instance.
- Running Everything as Administrator – Always follow least-privilege principles to avoid unnecessary exposure.
- Neglecting Backups – A fresh installation might feel safe, but without backups, you risk losing progress during learning or testing.
- Ignoring Updates – Running outdated versions exposes you to bugs and vulnerabilities.
- Underestimating Storage Paths – System and user SaaS database should be separated on production systems for performance and manageability.
Hands-On Exercise for Beginners
Once SQL Server is installed, try the following exercise:
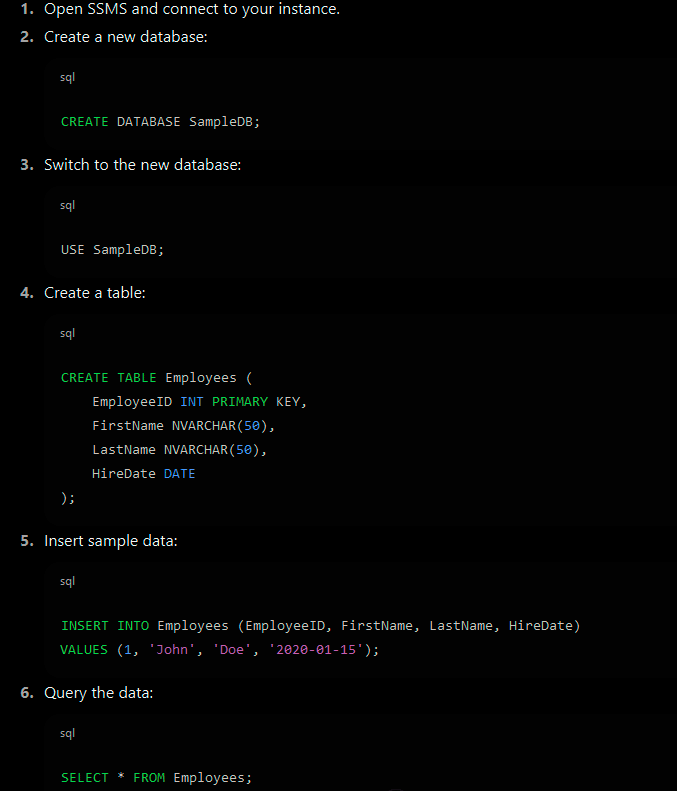
This simple workflow validates that your SQL Server environment is functional and ready for further exploration.
Setting up SQL Server is the critical first step in a data professional’s journey. By carefully selecting the edition, preparing prerequisites, and following best practices in configuration, even beginners can deploy a secure, reliable, and scalable database system. SQL Tune encourages learners to not only install and configure SQL Server but to understand the rationale behind each choice, setting a strong foundation for future database development and administration.